Writing a template compatible for Unraid
This is an effort to collect information from Squid's FAQ.
Prerequisites
Enabling Template Authoring Mode
In order to have a smooth experience creating templates I highly recommend enabling Template Authoring Mode, it allows
you to see the XML in clear-text and some other small neat tricks we might need to come back to.
This process requires you to shut down the docker service for a short while, as Unraid doesn't let us change the setting
with the service running.
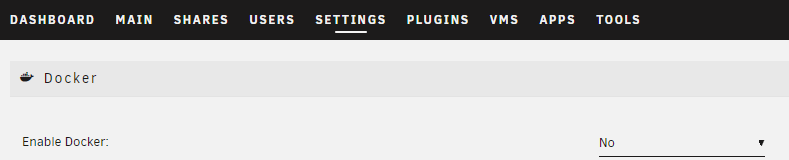
When the docker service is successfully shut down, enable advanced view.

We can now enable authoring mode, you can also toggle the docker service back on.

Auto-generating from Docker image
1. Search from Docker Hub
Make sure you can retrieve search results from Docker Hub
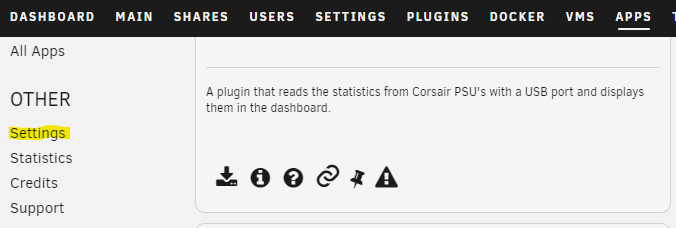
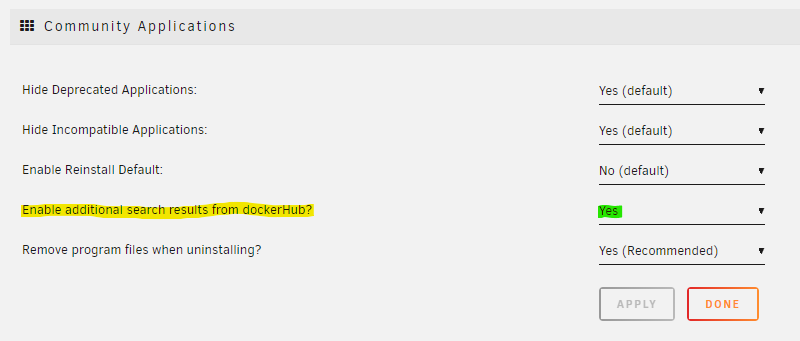
In order to have Community Applications generate a template, we need to enable additional search from Docker Hub. You do this by opening CA, and press the settings button on the sidebar, and enabling additional search.
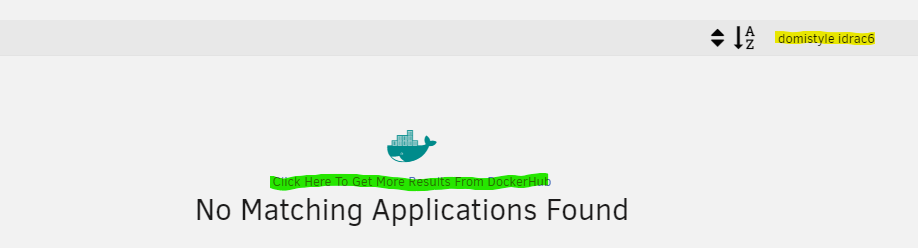
For this guide I will use domistyle/idrac6 as an example. Go back to CA, and type the image you want to create a
template for in the search bar (If you get a match now, chances are, it is already in CA) and
press Get More Results From Docker Hub.
Community Applications shows results for both the image-maintainer, and image-name. Which means that we will get similar
results. Press the download to disk icon, and let Community Applications convert it.

For this one Community Applications didn't do a very good job in converting it (It reads the Dockerfile for volumes,
expose, publish etc.), however we can modify it with the template editor in Unraid.
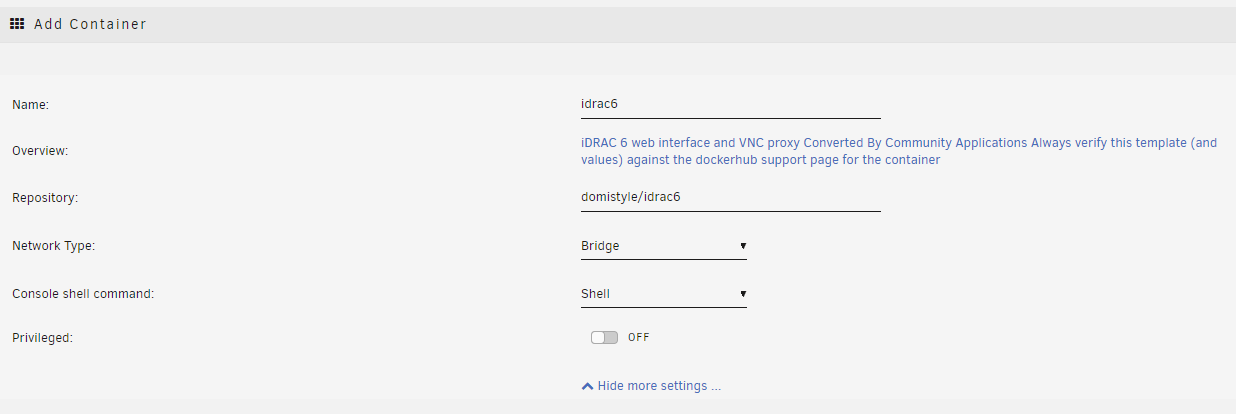
2. Edit the template
To see what we need to edit, we can most often refer to the readme of the container
(Including a screenshot in case the readme changes)
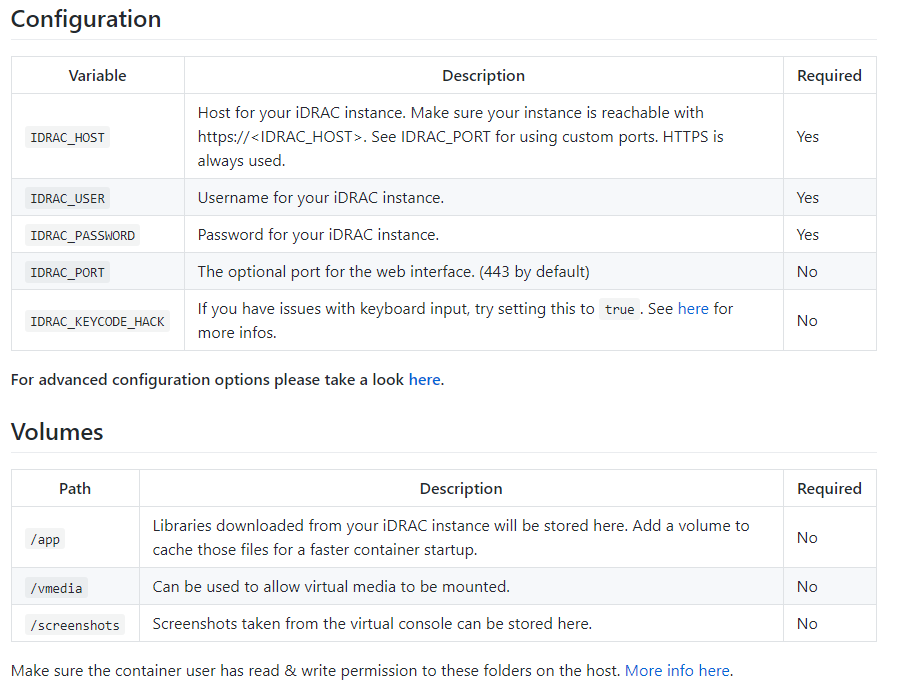 .
.
Get to know the template editor, its very handy. Also for managing existing templates.
I'm going through the rest of this guide with a mix of views (to remove clutter from images). If some of the settings
you see in a screenshot isn't showing to you, enable advanced view.

Variables
I will start with adding the variables, just because those are on the top of the documentation of this container.
To add the IDRAC_HOST variable, we are going to press the Add another Path, Port, Variable or Device link.
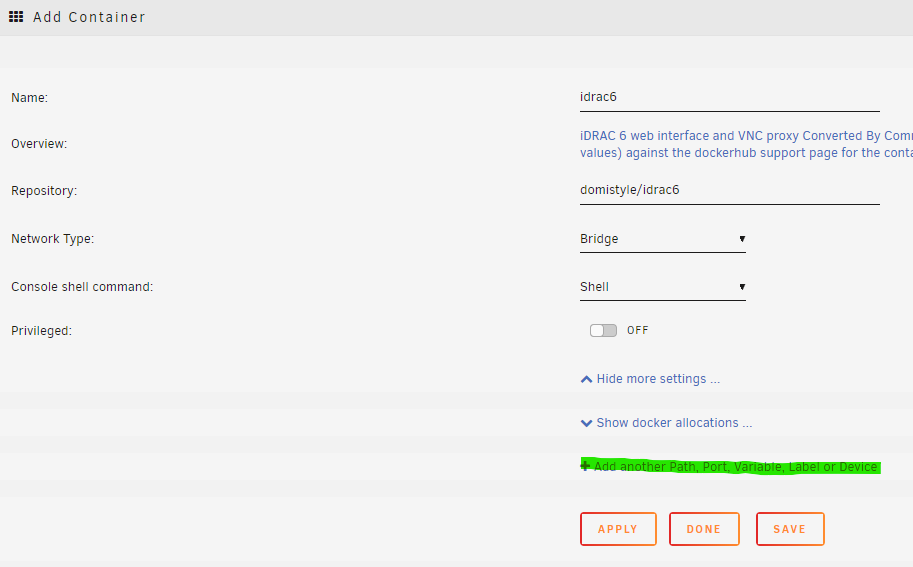
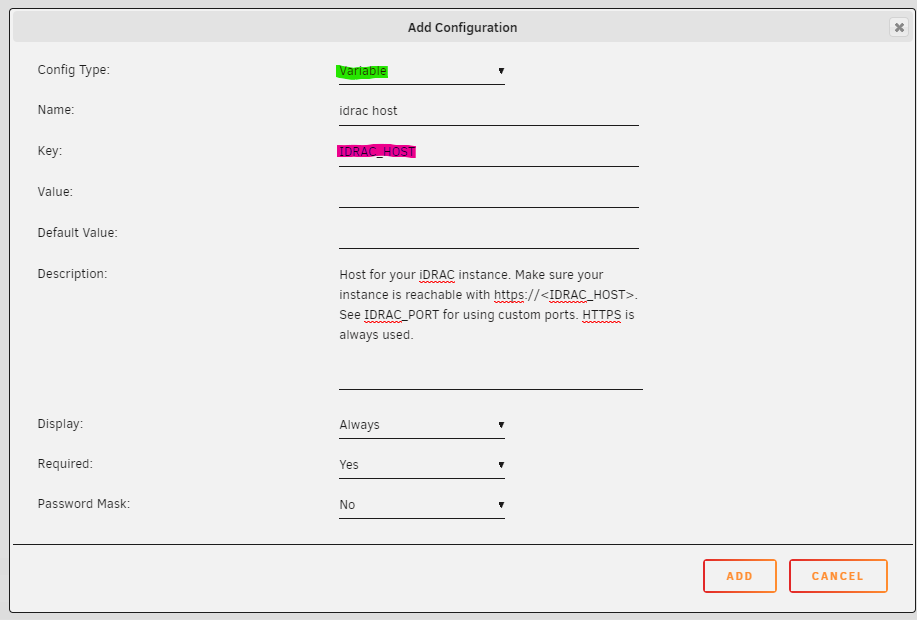
We need to change the Config Type to Variable, then we can start adding values. There is a lot going on here, but it is all going to make sense in the end.
-
Name- The name for the variable, this is to help the user identifying what this variable does. -
Key- This is the actual variable, so we are puttingIDRAC_HOSThere. -
Value- We don't fill this, this is for the user. -
Default Value- We could fill this, but since we can only do an estimated guess on what a users idrac host is, we are going to skip it. -
Description- Usually I don't fill this field with this long of a text, but the documentation of the container had a good one, so I'm using it. -
Display- This decides if the "average user" (someone that isn't using advanced view) is going to see this variable. -
Required- I set this to yes because I know the container wont work without it set. The fact that the documentation tells me its required also helped in the decision. -
Password Mask- This isn't a password, so it doesn't need to have its value masked behind asterisk (*).
Here are some screenshots on how I added the other required variables
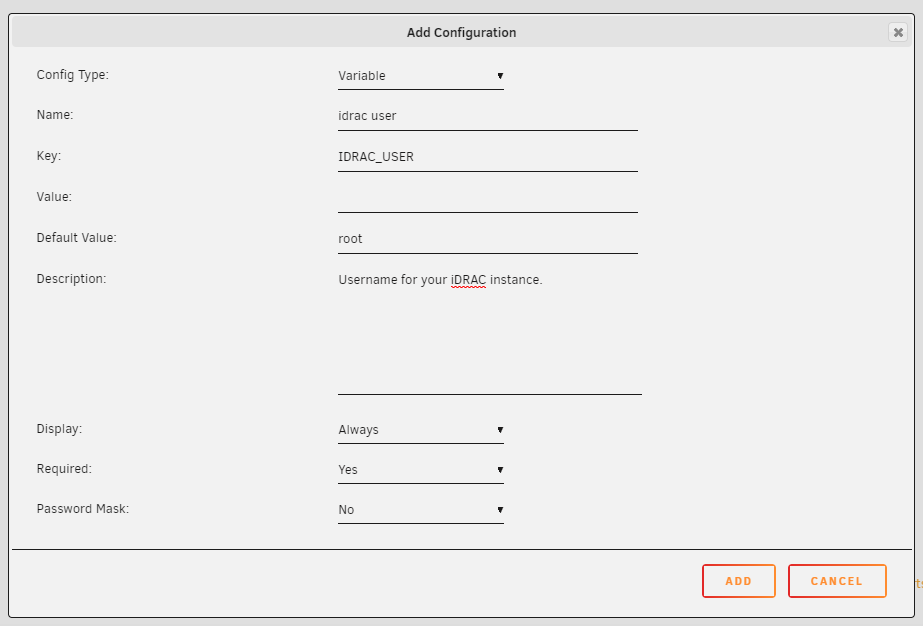 Here I set the Default value as root, since I know that's the default username on idrac
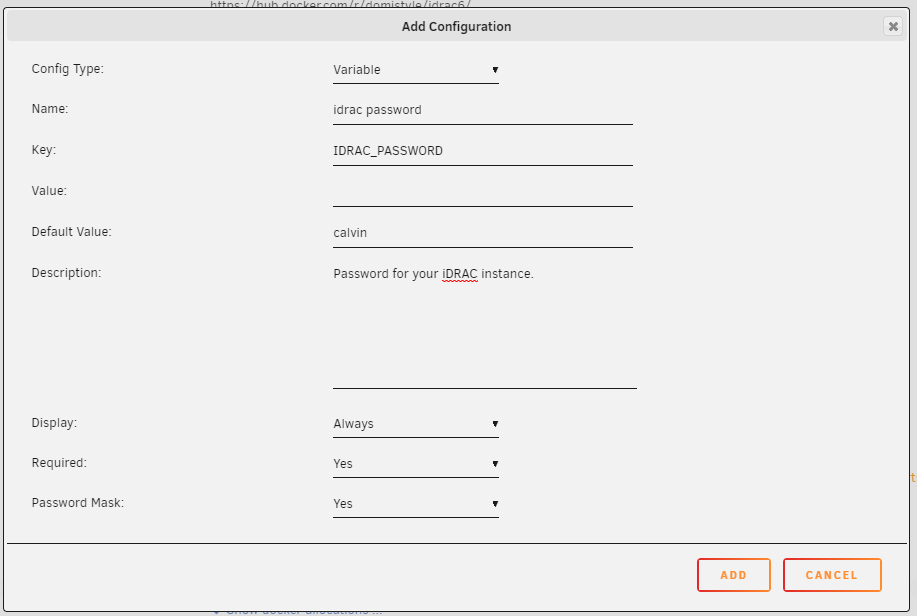 Here I set the Default value as calvin, since I know that's the default password on idrac, I also enabled Password Mask
Volumes
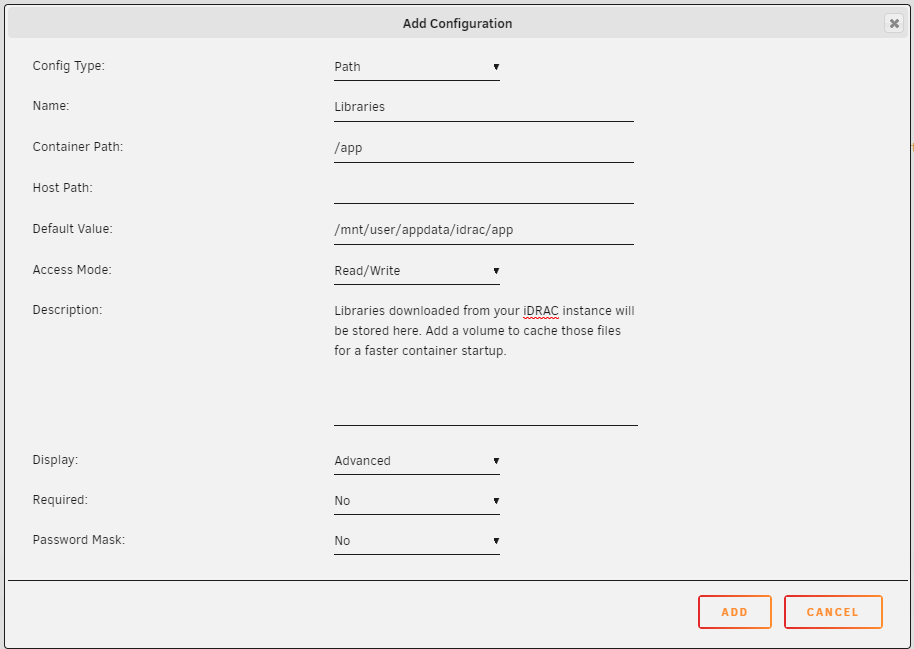
Next is adding the volumes. We press the same Add another Path, Port, Variable or Device link, but we don't need to
change the config type this time.
The fields we can add here is mostly the same, but with the "Volume" type some of them are voided. Like password mask.
If it's a "proper" appdata location, I set required to yes
Access Mode- Defines how the container should have access to this volume. Almost alwaysread/write
Ports
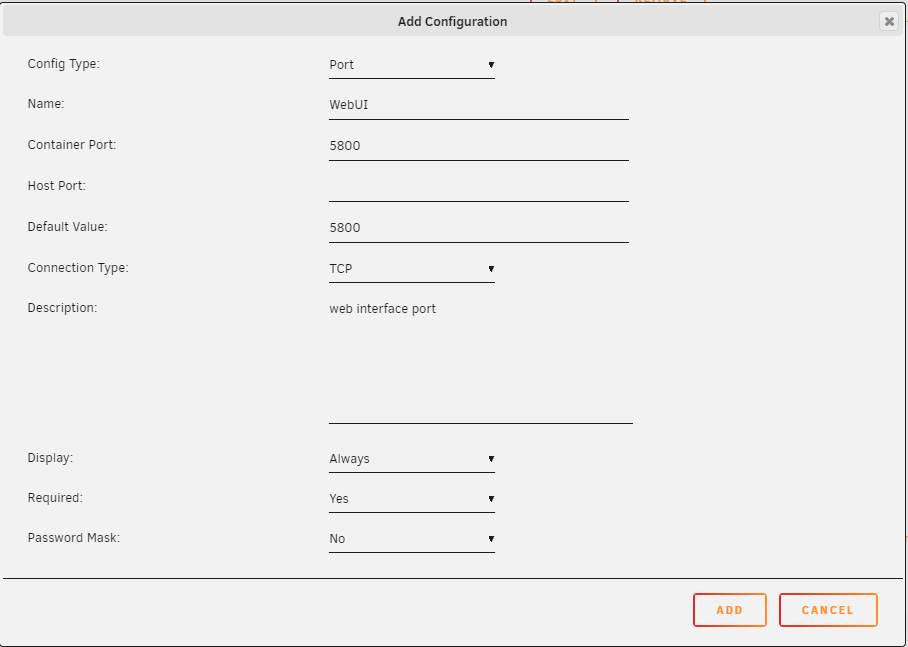
Now it is time for the ports. We press the same Add another Path, Port, Variable or Device link. This time we need to
change the config type to Port.
The documentation for this container says we can use port 5800 to access the interface, so that's the port we are going to add. It also mentions the VNC port, but most users wont need this.
Connection Type- AlwaysTCP, unless specified otherwise.
Metadata
Now you have a basic template. This might be enough for your own usage, but in order to add it to Community Applications we should add some spice to the template.
As you can see there are lots of fields we can fill in with the template editor.
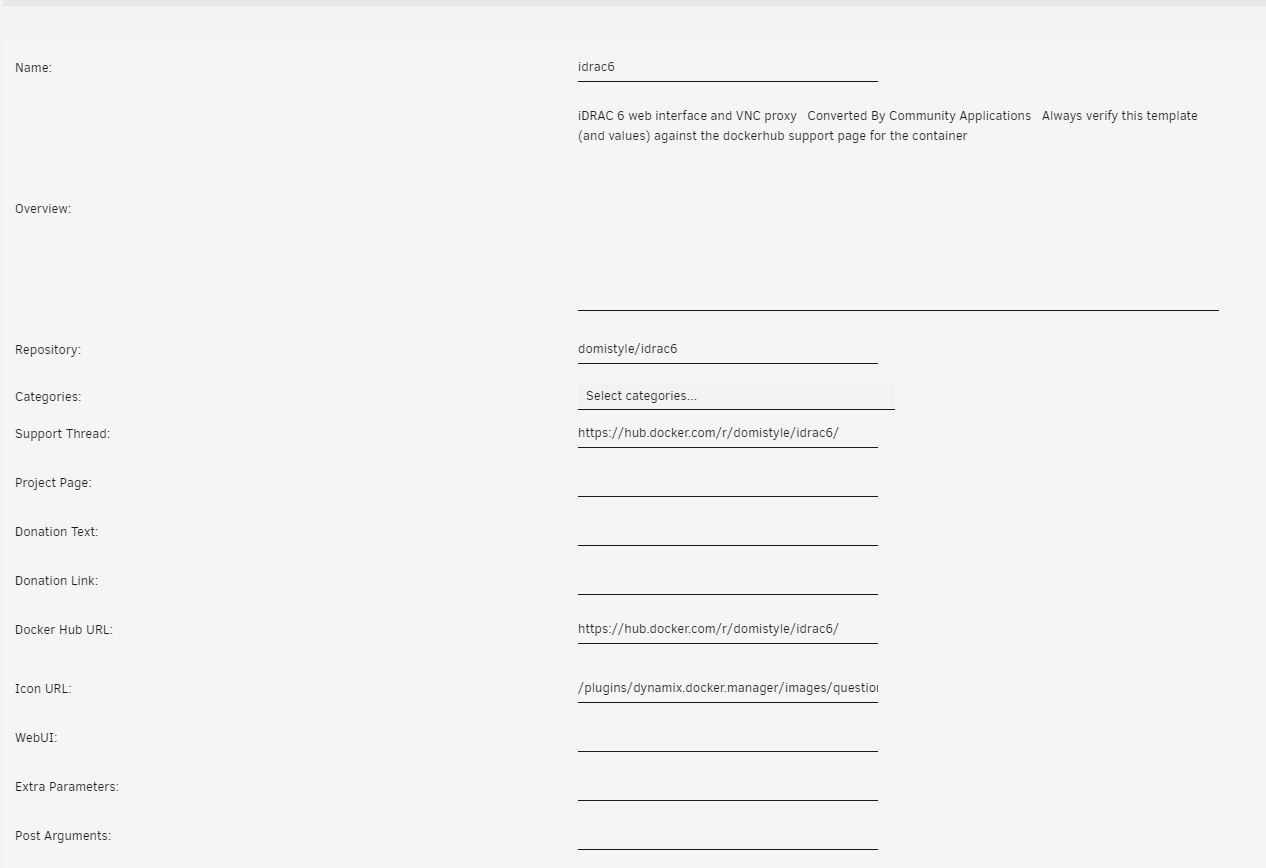
I'm not going to walk you through this, but I am going to tell you how it ended up like it did.
I changed the overview to match the intro from the readme of the container.
I used the dropdown to set the categories as I saw fit.
I set the support thread as the issue page of the project.
!!! danger "Do not do this if you are creating a template for your own container, create a support thread on the Unraid forums and use that link"
The project page is usually the GitHub link to the container.
I have yet to change the Icon URL, because I need to create an icon.
WebUI Should be filled with the container port, Unraid should do the translation http://[IP]:[PORT:5800]. If this
is an https enabled port, set the url to use https.
For Post arguments and Extra Parameters, you should know if you need to fill this.
There is more information on this in the Manual way part

3. Grab the XML
Once you have filled all the fields, and set the ports, variables and volumes as good as you can, you can press
the Save button, this takes you to a page where can see the xml in plain-text. Don't worry, it also saves the xml to
your OS disk. Bellow is the XML generated by the procedure above.
Extracted XML
<?xml version="1.0"?>
<Container version="2">
<Name>idrac6</Name>
<Repository>domistyle/idrac6</Repository>
<Registry>https://hub.docker.com/r/domistyle/idrac6/</Registry>
<Network>bridge</Network>
<MyIP/>
<Shell>sh</Shell>
<Privileged>false</Privileged>
<Support>https://github.com/DomiStyle/docker-idrac6/issues</Support>
<Project>https://github.com/DomiStyle/docker-idrac6/</Project>
<Overview>Allows access to the iDRAC 6 console without installing Java or messing with Java Web Start. Java is only run inside of the container and access is provided via web interface or directly with VNC.</Overview>
<Category>Tools: Network:Management</Category>
<WebUI>http://[IP]:[PORT:5800]</WebUI>
<TemplateURL/>
<Icon>/plugins/dynamix.docker.manager/images/question.png</Icon>
<ExtraParams/>
<PostArgs/>
<CPUset/>
<DateInstalled>1579532295</DateInstalled>
<DonateText/>
<DonateLink/>
<Description>Allows access to the iDRAC 6 console without installing Java or messing with Java Web Start. Java is only run inside of the container and access is provided via web interface or directly with VNC.</Description>
<Networking>
<Mode>bridge</Mode>
<Publish>
<Port>
<HostPort/>
<ContainerPort>5800</ContainerPort>
<Protocol>tcp</Protocol>
</Port>
</Publish>
</Networking>
<Data>
<Volume>
<HostDir/>
<ContainerDir>/vmedia</ContainerDir>
<Mode>rw</Mode>
</Volume>
<Volume>
<HostDir/>
<ContainerDir>/app</ContainerDir>
<Mode>rw</Mode>
</Volume>
<Volume>
<HostDir/>
<ContainerDir>/screenshots</ContainerDir>
<Mode>rw</Mode>
</Volume>
</Data>
<Environment>
<Variable>
<Value/>
<Name>IDRAC_HOST</Name>
<Mode/>
</Variable>
<Variable>
<Value/>
<Name>IDRAC_USER</Name>
<Mode/>
</Variable>
<Variable>
<Value/>
<Name>IDRAC_PASSWORD</Name>
<Mode/>
</Variable>
<Variable>
<Value/>
<Name>IDRAC_PORT</Name>
<Mode/>
</Variable>
<Variable>
<Value>false</Value>
<Name>IDRAC_KEYCODE_HACK</Name>
<Mode/>
</Variable>
<Variable>
<Value>99</Value>
<Name>USER_ID</Name>
<Mode/>
</Variable>
<Variable>
<Value>100</Value>
<Name>GROUP_ID</Name>
<Mode/>
</Variable>
</Environment>
<Labels/>
<Config Name="idrac host" Target="IDRAC_HOST" Default="" Mode="" Description="Host for your iDRAC instance. Make sure your instance is reachable with https://&lt;IDRAC_HOST&gt;. See IDRAC_PORT for using custom ports. HTTPS is always used." Type="Variable" Display="always" Required="true" Mask="false"/>
<Config Name="idrac user" Target="IDRAC_USER" Default="root" Mode="" Description="Username for your iDRAC instance." Type="Variable" Display="always" Required="true" Mask="false"/>
<Config Name="idrac password" Target="IDRAC_PASSWORD" Default="calvin" Mode="" Description="Password for your iDRAC instance." Type="Variable" Display="always" Required="true" Mask="true"/>
<Config Name="WebUI" Target="5800" Default="5800" Mode="tcp" Description="web interface port" Type="Port" Display="always" Required="true" Mask="false"/>
<Config Name="idrac port" Target="IDRAC_PORT	" Default="443" Mode="" Description="The optional port for the web interface." Type="Variable" Display="advanced-hide" Required="false" Mask="false"/>
<Config Name="keyboard fix" Target="IDRAC_KEYCODE_HACK" Default="false|true" Mode="" Description="If you have issues with keyboard input, try setting this to true." Type="Variable" Display="advanced-hide" Required="false" Mask="false">false</Config>
<Config Name="PUID" Target="USER_ID" Default="" Mode="" Description="PUID" Type="Variable" Display="advanced" Required="false" Mask="false">99</Config>
<Config Name="PGID" Target="GROUP_ID" Default="" Mode="" Description="PGID" Type="Variable" Display="advanced" Required="false" Mask="false">100</Config>
<Config Name="Virtual media" Target="/vmedia" Default="/mnt/user/appdata/idrac/vmedia" Mode="rw" Description="Can be used to allow virtual media to be mounted." Type="Path" Display="advanced" Required="false" Mask="false"/>
<Config Name="Libraries" Target="/app" Default="/mnt/user/appdata/idrac/app" Mode="rw" Description="Libraries downloaded from your iDRAC instance will be stored here. Add a volume to cache those files for a faster container startup." Type="Path" Display="advanced" Required="false" Mask="false"/>
<Config Name="Screenshots" Target="/screenshots" Default="/mnt/user/appdata/idrac/screenshots" Mode="rw" Description="Container Path: /screenshots" Type="Path" Display="advanced" Required="false" Mask="false"/>
</Container>
4. Clean the XML
Community Applications adds a lot of stuff that is not necessary for a template, but which Unraid uses to actually run and present the container.
My first steps in removing unnecessary tags is to delete tags that are closed without value, like <MyIP/>.
XML after
<?xml version="1.0"?>
<Container version="2">
<Name>idrac6</Name>
<Repository>domistyle/idrac6</Repository>
<Registry>https://hub.docker.com/r/domistyle/idrac6/</Registry>
<Network>bridge</Network>
<Shell>sh</Shell>
<Privileged>false</Privileged>
<Support>https://github.com/DomiStyle/docker-idrac6/issues</Support>
<Project>https://github.com/DomiStyle/docker-idrac6/</Project>
<Overview>Allows access to the iDRAC 6 console without installing Java or messing with Java Web Start. Java is only run inside of the container and access is provided via web interface or directly with VNC.</Overview>
<Category>Tools: Network:Management</Category>
<WebUI>http://[IP]:[PORT:5800]</WebUI>
<Icon>/plugins/dynamix.docker.manager/images/question.png</Icon>
<DateInstalled>1579532295</DateInstalled>
<Description>Allows access to the iDRAC 6 console without installing Java or messing with Java Web Start. Java is only run inside of the container and access is provided via web interface or directly with VNC.</Description>
<Networking>
<Mode>bridge</Mode>
<Publish>
<Port>
<HostPort/>
<ContainerPort>5800</ContainerPort>
<Protocol>tcp</Protocol>
</Port>
</Publish>
</Networking>
<Data>
<Volume>
<HostDir/>
<ContainerDir>/vmedia</ContainerDir>
<Mode>rw</Mode>
</Volume>
<Volume>
<HostDir/>
<ContainerDir>/app</ContainerDir>
<Mode>rw</Mode>
</Volume>
<Volume>
<HostDir/>
<ContainerDir>/screenshots</ContainerDir>
<Mode>rw</Mode>
</Volume>
</Data>
<Environment>
<Variable>
<Value/>
<Name>IDRAC_HOST</Name>
<Mode/>
</Variable>
<Variable>
<Value/>
<Name>IDRAC_USER</Name>
<Mode/>
</Variable>
<Variable>
<Value/>
<Name>IDRAC_PASSWORD</Name>
<Mode/>
</Variable>
<Variable>
<Value/>
<Name>IDRAC_PORT</Name>
<Mode/>
</Variable>
<Variable>
<Value>false</Value>
<Name>IDRAC_KEYCODE_HACK</Name>
<Mode/>
</Variable>
<Variable>
<Value>99</Value>
<Name>USER_ID</Name>
<Mode/>
</Variable>
<Variable>
<Value>100</Value>
<Name>GROUP_ID</Name>
<Mode/>
</Variable>
</Environment>
<Config Name="idrac host" Target="IDRAC_HOST" Default="" Mode="" Description="Host for your iDRAC instance. Make sure your instance is reachable with https://&lt;IDRAC_HOST&gt;. See IDRAC_PORT for using custom ports. HTTPS is always used." Type="Variable" Display="always" Required="true" Mask="false"/>
<Config Name="idrac user" Target="IDRAC_USER" Default="root" Mode="" Description="Username for your iDRAC instance." Type="Variable" Display="always" Required="true" Mask="false"/>
<Config Name="idrac password" Target="IDRAC_PASSWORD" Default="calvin" Mode="" Description="Password for your iDRAC instance." Type="Variable" Display="always" Required="true" Mask="true"/>
<Config Name="WebUI" Target="5800" Default="5800" Mode="tcp" Description="web interface port" Type="Port" Display="always" Required="true" Mask="false"/>
<Config Name="idrac port" Target="IDRAC_PORT	" Default="443" Mode="" Description="The optional port for the web interface." Type="Variable" Display="advanced-hide" Required="false" Mask="false"/>
<Config Name="keyboard fix" Target="IDRAC_KEYCODE_HACK" Default="false|true" Mode="" Description="If you have issues with keyboard input, try setting this to true." Type="Variable" Display="advanced-hide" Required="false" Mask="false">false</Config>
<Config Name="PUID" Target="USER_ID" Default="" Mode="" Description="PUID" Type="Variable" Display="advanced" Required="false" Mask="false">99</Config>
<Config Name="PGID" Target="GROUP_ID" Default="" Mode="" Description="PGID" Type="Variable" Display="advanced" Required="false" Mask="false">100</Config>
<Config Name="Virtual media" Target="/vmedia" Default="/mnt/user/appdata/idrac/vmedia" Mode="rw" Description="Can be used to allow virtual media to be mounted." Type="Path" Display="advanced" Required="false" Mask="false"/>
<Config Name="Libraries" Target="/app" Default="/mnt/user/appdata/idrac/app" Mode="rw" Description="Libraries downloaded from your iDRAC instance will be stored here. Add a volume to cache those files for a faster container startup." Type="Path" Display="advanced" Required="false" Mask="false"/>
<Config Name="Screenshots" Target="/screenshots" Default="/mnt/user/appdata/idrac/screenshots" Mode="rw" Description="Container Path: /screenshots" Type="Path" Display="advanced" Required="false" Mask="false"/>
</Container>
Since I prefer using just the Config tags, I also remove the tags Networking, Data and Environment together with
it's content.
XML after
<?xml version="1.0"?>
<Container version="2">
<Name>idrac6</Name>
<Repository>domistyle/idrac6</Repository>
<Registry>https://hub.docker.com/r/domistyle/idrac6/</Registry>
<Network>bridge</Network>
<Shell>sh</Shell>
<Privileged>false</Privileged>
<Support>https://github.com/DomiStyle/docker-idrac6/issues</Support>
<Project>https://github.com/DomiStyle/docker-idrac6/</Project>
<Overview>Allows access to the iDRAC 6 console without installing Java or messing with Java Web Start. Java is only run inside of the container and access is provided via web interface or directly with VNC.</Overview>
<Category>Tools: Network:Management</Category>
<WebUI>http://[IP]:[PORT:5800]</WebUI>
<Icon>/plugins/dynamix.docker.manager/images/question.png</Icon>
<DateInstalled>1579532295</DateInstalled>
<Description>Allows access to the iDRAC 6 console without installing Java or messing with Java Web Start. Java is only run inside of the container and access is provided via web interface or directly with VNC.</Description>
<Config Name="idrac host" Target="IDRAC_HOST" Default="" Mode="" Description="Host for your iDRAC instance. Make sure your instance is reachable with https://&lt;IDRAC_HOST&gt;. See IDRAC_PORT for using custom ports. HTTPS is always used." Type="Variable" Display="always" Required="true" Mask="false"/>
<Config Name="idrac user" Target="IDRAC_USER" Default="root" Mode="" Description="Username for your iDRAC instance." Type="Variable" Display="always" Required="true" Mask="false"/>
<Config Name="idrac password" Target="IDRAC_PASSWORD" Default="calvin" Mode="" Description="Password for your iDRAC instance." Type="Variable" Display="always" Required="true" Mask="true"/>
<Config Name="WebUI" Target="5800" Default="5800" Mode="tcp" Description="web interface port" Type="Port" Display="always" Required="true" Mask="false"/>
<Config Name="idrac port" Target="IDRAC_PORT	" Default="443" Mode="" Description="The optional port for the web interface." Type="Variable" Display="advanced-hide" Required="false" Mask="false"/>
<Config Name="keyboard fix" Target="IDRAC_KEYCODE_HACK" Default="false|true" Mode="" Description="If you have issues with keyboard input, try setting this to true." Type="Variable" Display="advanced-hide" Required="false" Mask="false">false</Config>
<Config Name="PUID" Target="USER_ID" Default="" Mode="" Description="PUID" Type="Variable" Display="advanced" Required="false" Mask="false">99</Config>
<Config Name="PGID" Target="GROUP_ID" Default="" Mode="" Description="PGID" Type="Variable" Display="advanced" Required="false" Mask="false">100</Config>
<Config Name="Virtual media" Target="/vmedia" Default="/mnt/user/appdata/idrac/vmedia" Mode="rw" Description="Can be used to allow virtual media to be mounted." Type="Path" Display="advanced" Required="false" Mask="false"/>
<Config Name="Libraries" Target="/app" Default="/mnt/user/appdata/idrac/app" Mode="rw" Description="Libraries downloaded from your iDRAC instance will be stored here. Add a volume to cache those files for a faster container startup." Type="Path" Display="advanced" Required="false" Mask="false"/>
<Config Name="Screenshots" Target="/screenshots" Default="/mnt/user/appdata/idrac/screenshots" Mode="rw" Description="Container Path: /screenshots" Type="Path" Display="advanced" Required="false" Mask="false"/>
</Container>
Remove DateInstalled, since it's just used internally for Unraid.
Unless you know what shell the container uses, also remove Shell.
What I consider a good XML, to base a PR on
<?xml version="1.0"?>
<Container version="2">
<Name>idrac6</Name>
<Repository>domistyle/idrac6</Repository>
<Registry>https://hub.docker.com/r/domistyle/idrac6/</Registry>
<Network>bridge</Network>
<Privileged>false</Privileged>
<Support>https://github.com/DomiStyle/docker-idrac6/issues</Support>
<Project>https://github.com/DomiStyle/docker-idrac6/</Project>
<Overview>Allows access to the iDRAC 6 console without installing Java or messing with Java Web Start. Java is only run inside of the container and access is provided via web interface or directly with VNC.</Overview>
<Category>Tools: Network:Management</Category>
<WebUI>http://[IP]:[PORT:5800]</WebUI>
<Icon>/plugins/dynamix.docker.manager/images/question.png</Icon>
<Description>Allows access to the iDRAC 6 console without installing Java or messing with Java Web Start. Java is only run inside of the container and access is provided via web interface or directly with VNC.</Description>
<Config Name="idrac host" Target="IDRAC_HOST" Default="" Mode="" Description="Host for your iDRAC instance. Make sure your instance is reachable with https://&lt;IDRAC_HOST&gt;. See IDRAC_PORT for using custom ports. HTTPS is always used." Type="Variable" Display="always" Required="true" Mask="false"/>
<Config Name="idrac user" Target="IDRAC_USER" Default="root" Mode="" Description="Username for your iDRAC instance." Type="Variable" Display="always" Required="true" Mask="false"/>
<Config Name="idrac password" Target="IDRAC_PASSWORD" Default="calvin" Mode="" Description="Password for your iDRAC instance." Type="Variable" Display="always" Required="true" Mask="true"/>
<Config Name="WebUI" Target="5800" Default="5800" Mode="tcp" Description="web interface port" Type="Port" Display="always" Required="true" Mask="false"/>
<Config Name="idrac port" Target="IDRAC_PORT	" Default="443" Mode="" Description="The optional port for the web interface." Type="Variable" Display="advanced-hide" Required="false" Mask="false"/>
<Config Name="keyboard fix" Target="IDRAC_KEYCODE_HACK" Default="false|true" Mode="" Description="If you have issues with keyboard input, try setting this to true." Type="Variable" Display="advanced-hide" Required="false" Mask="false">false</Config>
<Config Name="PUID" Target="USER_ID" Default="" Mode="" Description="PUID" Type="Variable" Display="advanced" Required="false" Mask="false">99</Config>
<Config Name="PGID" Target="GROUP_ID" Default="" Mode="" Description="PGID" Type="Variable" Display="advanced" Required="false" Mask="false">100</Config>
<Config Name="Virtual media" Target="/vmedia" Default="/mnt/user/appdata/idrac/vmedia" Mode="rw" Description="Can be used to allow virtual media to be mounted." Type="Path" Display="advanced" Required="false" Mask="false"/>
<Config Name="Libraries" Target="/app" Default="/mnt/user/appdata/idrac/app" Mode="rw" Description="Libraries downloaded from your iDRAC instance will be stored here. Add a volume to cache those files for a faster container startup." Type="Path" Display="advanced" Required="false" Mask="false"/>
<Config Name="Screenshots" Target="/screenshots" Default="/mnt/user/appdata/idrac/screenshots" Mode="rw" Description="Container Path: /screenshots" Type="Path" Display="advanced" Required="false" Mask="false"/>
</Container>
More spice
It's worth reading Add a Config Entry and XML Field Explanations to see if any of that applies to your template.
Manually writing a template
1. Starting from "scratch"
To make sure we don't miss anything, we are going to start from a baseXML.
I'm using the same example-container as above.
Knowing the basics of XML is preferred
baseXML
<?xml version="1.0"?>
    <Container version="2">
    <Name></Name>
    <Repository></Repository>
    <Registry></Registry>
    <Network>bridge</Network>
    <Privileged>false</Privileged>
    <Support></Support>
    <Project></Project>
    <Overview></Overview>
    <WebUI></WebUI>
    <TemplateURL/>
    <Icon>/plugins/dynamix.docker.manager/images/question.png</Icon>
    <ExtraParams/>
    <PostArgs/>
    <DonateText/>
    <DonateLink/>
</Container>
2. Fill the base
Since you are here browsing the "hard" way, I'm assuming you know some, if not most of the Docker terminology used going forward.
Filling the baseXML above is pretty straight forward, however the tags expect the following:
-
Name- The name for the container, preferably in lowercase. -
Repository- The name of the image to pull from Docker Hub (other repositories work). e.g.domistyle/idrac6 -
Registry- Link to the Docker Hub page for this container. e.g.https://hub.docker.com/r/domistyle/idrac6/ -
Support- A link to a support thread on the Unraid forums for the container -
Project- Link to the GitHub page (or the homepage of the project) e.g.https://github.com/DomiStyle/docker-idrac6/ -
Overview- Basic description of the project. e.g.Allows access to the iDRAC 6 console without installing Java or messing with Java Web Start. Java is only run inside of the container and access is provided via web interface or directly with VNC.
-
WebUI- Which container-port a web UI might be on. e.g.http://[IP]:[PORT:5800]Unraid will translate this string to the IP of the server, and the host-port set for container-port 5800 -
IconURL to an icon, personally I prefer them in png. It has to be loaded over https. e.g.https://raw.githubusercontent.com/selfhosters/unRAID-CA-templates/master/templates/img/chevereto.png {:
style="height:1em"}
{:
style="height:1em"} -
ExtraParams- Parameters sent with thedocker runcommand. e.g.--restart unless-stopped -
PostArgs- Command to run inside the container after start. e.g./bin/sh -c 'apk update && apk add ipmitool && telegraf'See valid example -
DonateText- Text to show with the donate button. -
DonateLink- URL for donations. -
Network- Usuallybridgeif not specified by the image maintainer -
TemplateURL- URL to the template. If it is a PR to our repo, set it tohttps://raw.githubusercontent.com/selfhosters/unRAID-CA-templates/master/templates/<container-name>.xmland replace<container-name>with the actual name of the container (again, in lowercase).
Warning
Has to be a raw link for GitHub.
DonateImgURL to donation image.
3. Add a Config entry
There are two ways to achieve this, but I'm only going to focus on one of them. The syntax is like this:
<Config Name="" Target="" Default="" Mode="rw" Description="" Type="Path" Display="always" Required="false"
        Mask="false"/>
This syntax spans over all the 4 config types, some attributes changes meaning depending on the Type.
Add a Volume
The volume specific values are:
-
Target- The container path for the volume. e.g./config -
Mode- What permissions to use for the volume.rwas ReadWriteroas ReadOnly- Slave options are also supported
-
Type- AlwaysPath.
Add a Variable
-
Target- The variable. e.g.IDRAC_HOST -
Type- AlwaysVariable.
Add a Port
-
Target- The container port. e.g.80 -
Type- AlwaysPort.
Shared attributes
-
Name- The name that shows in the Unraid template manager. e.g.Appdata,PUID,WebUI -
Description- A more detailed description on this Config. e.gAppdata location,PUID,WebUI -
Default- Suggested value for the Config. e.g./mnt/user/appdata/idrac,99,8080 -
Display- How the volume is shown to the user.alwaysAlways show the volume, can be edited and deleted in basic view.always-hideAlways show the volume, cannot be edited and deleted in basic view.advancedShows when the user pressesShow more settings ..., can be edited and deleted in basic view.advanced-hideShows when the user pressesShow more settings ..., cannot be edited and deleted in basic view.
-
RequiredIf the user is able to continue without specifying the value.trueorfalse -
MaskIf the value should be masked behind asterisks, only really useful on variables.trueorfalse
Tips and Tricks
Limit Config entry to predefined values
For a Config field, instead of allowing users to type in a value, you can provide a dropdown list of options. In
the Default attribute, list the available values separated by the pipe (|) character (e.g. Default="true|false").
This is highly recommended for boolean values.
Categorization tool
It's preferred to categorize your template, and recommended to use the "Application Categorizer" plugin to generate the
appropriate tags.

XML field explanations
This is an alphabetical, non-exhaustive list of the fields that can be provided in the <Container> section of the XML
template (as of Unraid 6.10+), and what they do. For a full list, see
the XML schema post.
Please note that a number of these fields are optional, and you should only include them if they are relevant to your container.
-
Banner- A URL to a banner image for the container. This should be a direct link to an image file, typically a PNG file. -
Beta- Gives the application a warning in Community Applications with the following textThis application has been marked as being Beta. This does NOT neccessarily mean that there will be issues.. Set to eithertrueorfalse. -
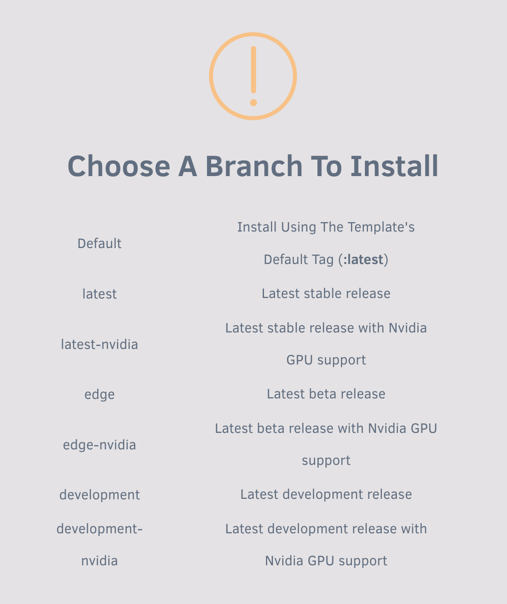
Branch- Offer different versions of the container to the user. This corresponds to different tags on the Docker image. For example, offer alatestbranch and abetabranch, or a version of the container that uses different GPU drivers.Screenshot
-
Tag- The tag of the Docker image to use. It is typical to include at least alatesttag, but other tags can be used as well. -
TagDescription- A description of the tag. This is displayed to the user when they are installing the container. -
Category- A list of categories that this template belongs to. Please use the "Application Categorizer" plugin to generate the appropriate tags. Proper categories make your template more discoverable in the Community Applications store. -
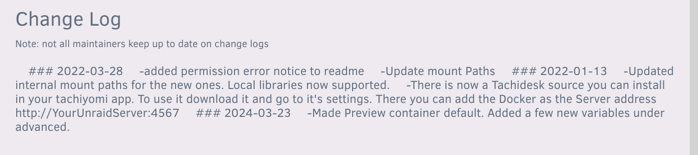
Changes- A changelog for the template. This should be used for changes to the template, NOT changes to the application itself. This is displayed in the Community Applications store entry. This only supports Markdown, not HTML.Screenshot
-
Config- A configuration entry for the container. See the Add a Config section for more information. -
Date- The date this container was last updated. This is used internally by Unraid and should not be modified. Do NOT include this in your template. -
DateInstalled- The date that the container was installed. This is used internally by Unraid and should not be modified. Do NOT include this in your template. -
Description- Deprecated. UseOverviewinstead.Screenshot
-
DonateText- Deprecated. This should be included in your Community Applications profile configuration instead. -
DonateLink- Deprecated. This should be included in your Community Applications profile configuration instead. -
ExtraParams- Additional parameters to pass to thedocker runcommand when starting the container. This should only be used for advanced configurations. -
ExtraSearchTerms- A space-delimited list of additional search terms for the container. This can be used to help users find the container in the Community Applications store. -
Icon- A URL to an icon for the container. This should be a direct link to an image file, typically a PNG file.- Different icons can be used for different themes to avoid, e.g. a black icon on a black background. Specify different icons based on the Unraid theme:
Icon-black,Icon-white,Icon-azure, andIcon-gray
- Different icons can be used for different themes to avoid, e.g. a black icon on a black background. Specify different icons based on the Unraid theme:
-
License- Information about the license for the container. -
Maintainer- Information about the maintainer of the template (you). This is displayed in the Community Applications store entry. -
WebPage- A link to your personal website or contact page. -
Name- The name of the container. This is what the template will be called in the Community Applications store ( including search results). -
Network- The networking mode for the container. This is often eitherbridgeorhost, but can also be the name of a custom network. -
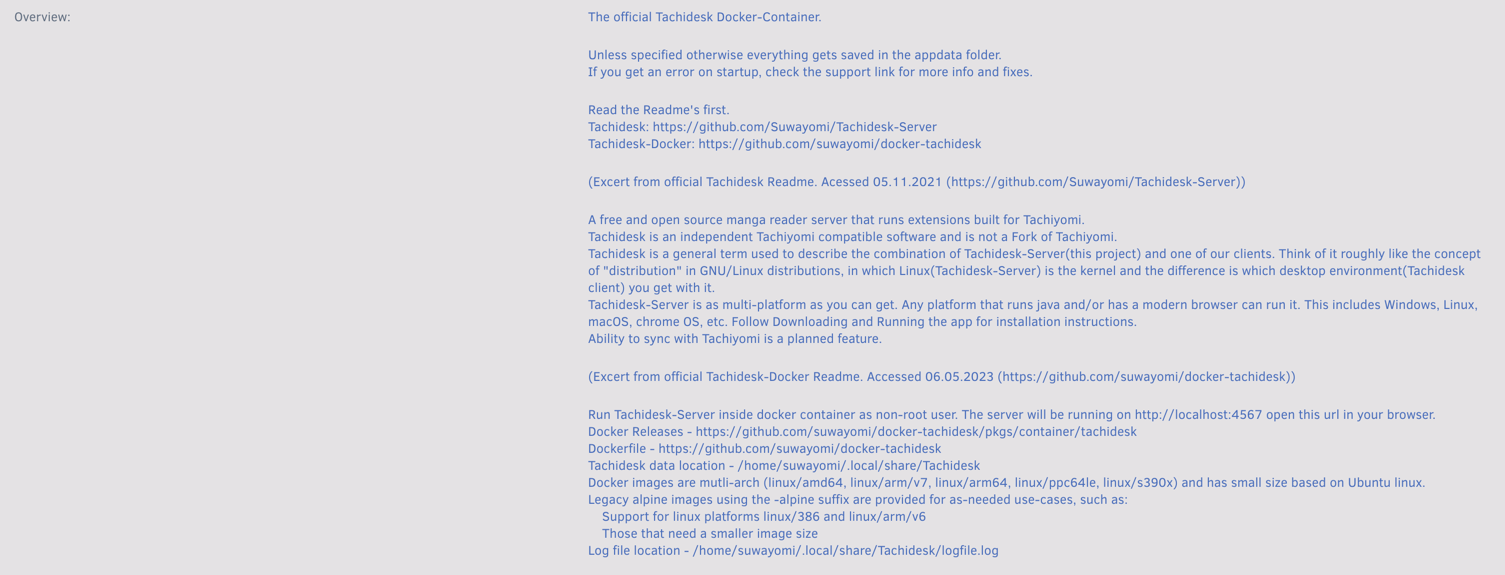
Overview- A description of the container. This is displayed in the Community Applications store entry and when the user is setting up the container. Include any important instructions or information here.Screenshot
-
Privileged- Whether the container should run in privileged mode. This can be a security risk and should be avoided if possible. -
Project- A link to the project's GitHub repository or other homepage. -
ReadMe- A link to a README file for the container. This will be displayed in the context menu (left-click on the container's icon) in the Docker tab. -
Registry- A link to the registry where the Docker image is located. This is often a link to the Docker Hub page for the image. -
Repository- A link to the repository where the Docker image can be downloaded from, in the patternregistry/author/app_name:tag_name. For example,author/app_name(defaults to Docker Hub andlatesttag), orghcr.io/author/app_name:preview(apreview-tagged image from the GitHub Container Registry). -
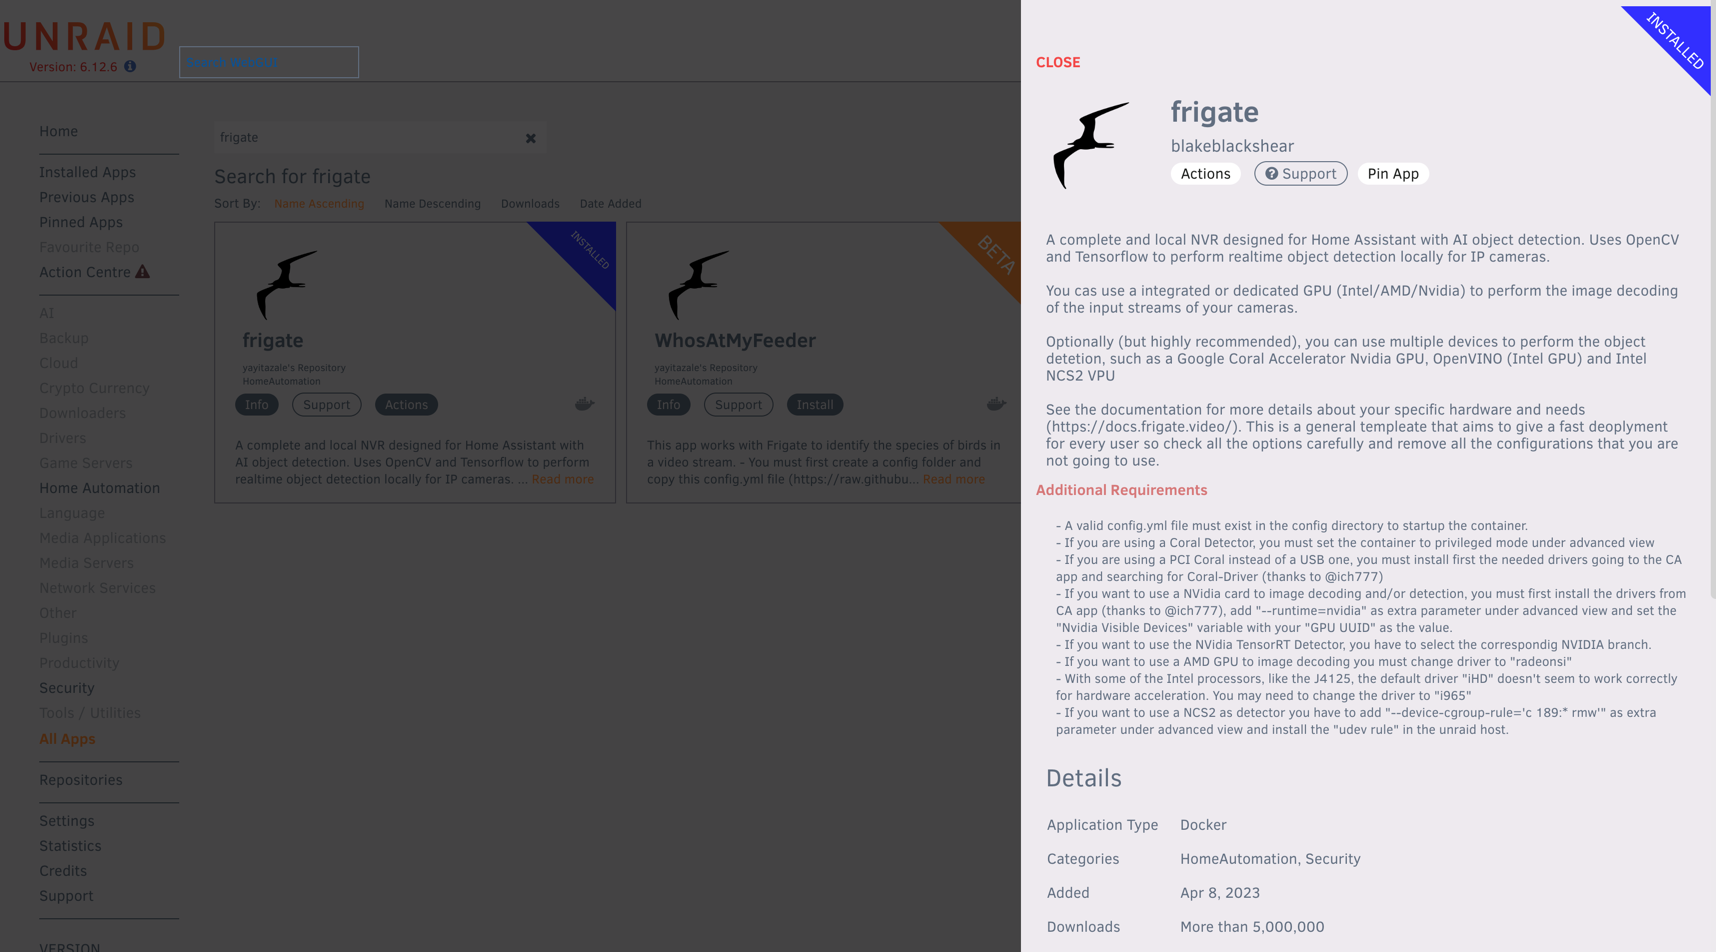
Requires- A warning message informing users of any prerequisites or requirements. This will be displayed:- in the "Additional Requirements" section of the app's Community Applications store entry
Screenshot
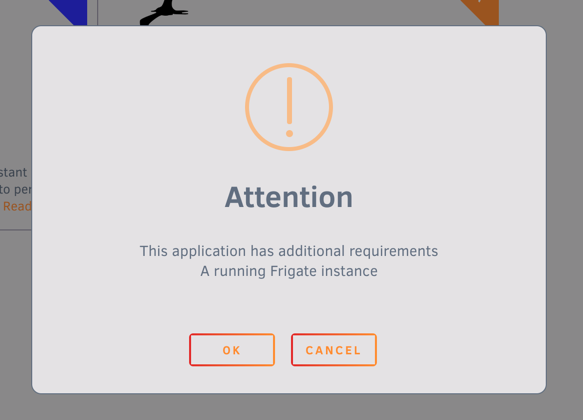
- in a pop-up when the user clicks "Install" in the Community Applications store
Screenshot
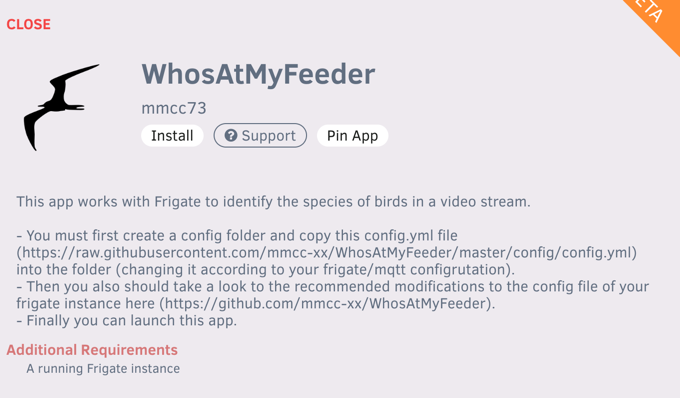
- in "Additional Requirements" on the container's settings page in Unraid
Screenshot

-
Screenshot- A link to an image to display in the Community Applications store entry. This should be a direct link to an image file, typically a PNG file. You can include multiple screenshots by adding multiple<Screenshot>tags.Screenshot
-
Shell- The shell to use when running commands in the container. This is typicallyshorbash. Do NOT include if you are unsure, as it can cause issues with the container. -
Support- A link to a support thread on the Unraid forums for the container. This will be mapped to the "Support" button on the Community Applications store entry. -
TemplateURL- A link to the raw XML file for the template hosted on GitHub. This should start withhttps://raw.githubusercontent.com/. -
WebUI- A pattern of the URL to access the web interface of the container, typically in the patternhttp://[IP]:[PORT:5000]. When provided, a "WebUI" option will be available in the context menu (left-click on the container's icon) in the Docker tab.Screenshot

-
Video- A link to a video about the container. This will be displayed in the Community Applications store entry.Screenshot